In this article, I will cover how to configure Google Cloud Identity as a SAML Identity Provider for the Palo Alto Networks platform. This is a use-case BitBodyguard has tackled both internally and for our G Suite customers which showcases the enormous value organizations can achieve from a $10/month/user G Suite subscription. Some of the leading IDPs charge that much (or more) per-service!
At the time this is published, no documented Cloud Identity integrations exist. We will address the initial limitations and workarounds necessary to complete integration for the most recent PAN-OS version, 8.1.3. The same steps can be taken to implement Google as a SAML IDP on any PAN-OS version > 8.0.
In addition to using Cloud Identity for authentication purposes, integrating Cloud Identity lets administrators take full advantage of Google’s inbuilt MFA (dubbed “2FA”). As a result, you can leverage Cloud Identity for a number of very interesting platform features to enhance your security posture:
- Globalprotect Client VPN
- Portals and/or Gateway authentication via SAML
- MFA enforcement via Google Push Notification, Google Authenticator, or Text/SMS
- Globalprotect Clientless VPN
- Portal authentication via SAML
- MFA enforcement via Google Push Notification, Google Authenticator, or Text/SMS
- Captive portal
- User-ID via Google Cloud Identity Authentication Profiles and Authentication rules
- MFA enforcement via Google Push Notification, Google Authenticator, or Text/SMS
- Administrative Access
- Authentication for administrators
- SAML role-based access mapping via “Admin Role Attribute”
- SAML SSO for administrator access
Configure Google Cloud Identity SAML IDP
Prerequisites:
- Enable Google Cloud Identity (free or premium)
- In your Google admin console, navigate to “Billing”
- Enable the Cloud Identity service of choice
Assumptions:
- For simplification, this guide assumes you are using the same FQDN or IP for the Globalprotect Portal and Gateway functions.
- The following use-cases would require you to add multiple SAML Applications, following the procedure below:
- Your organization is using different FQDNs or IP addresses for the Portal and Gateway
- Your organization has a distributed Gateway deployment. In this case, each additional Gateway would require another SAML application to be created within your admin console.
Step 1: Create the SAML Application
- In your Google Admin Panel, navigate to “Apps” >> “SAML Apps”
- You will create a custom application for Globalprotect
- Select the yellow + icon in the bottom-right of your screen to create a new SAML application
- Step 1 of 5: In the popup window, choose “SETUP MY OWN CUSTOM APP”. Until a pre-defined application is
created for Globalprotect, we will need to customize our own.

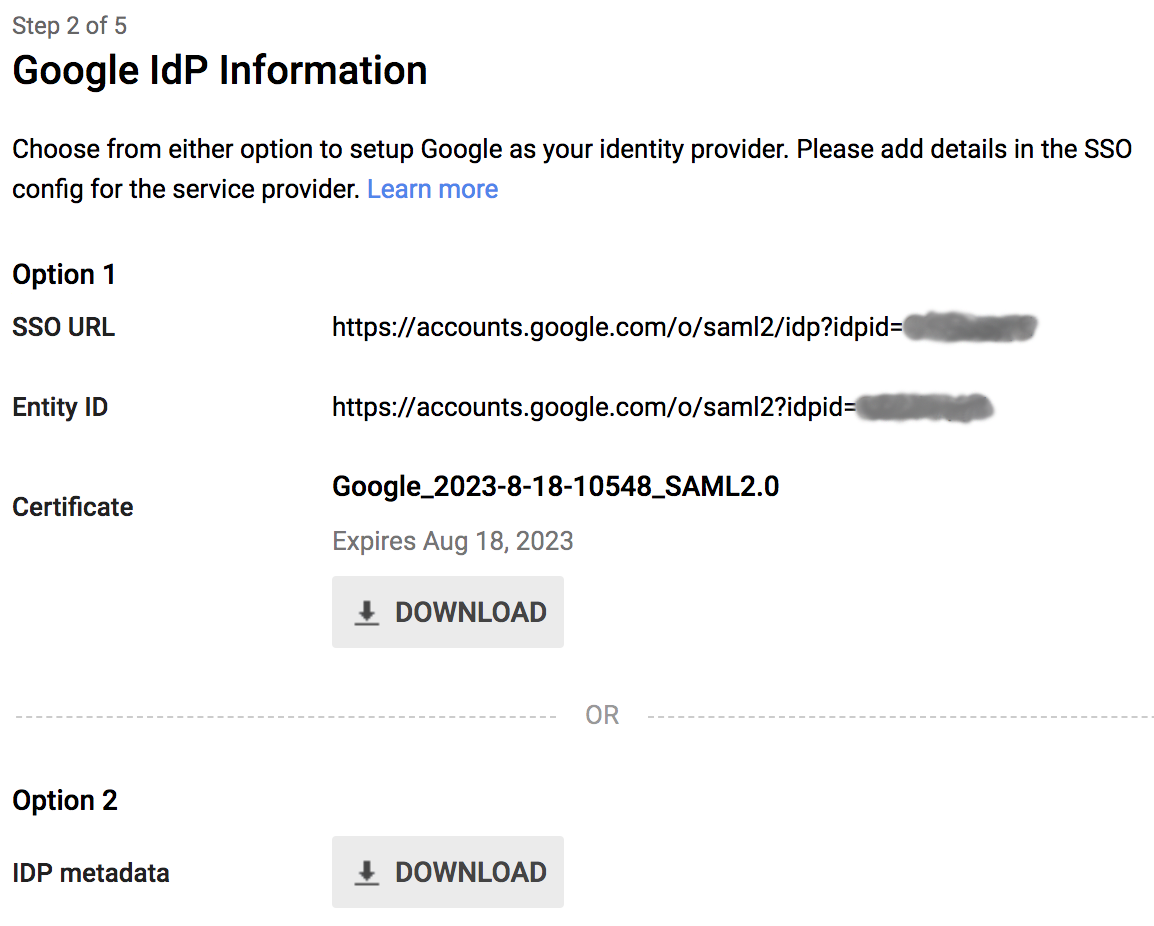
- Step 2 of 5: In this window, you will need to download both your IDP’s certificate as well as the IDP
metadata. The IDP metadata is the most critical piece, as this will enable us to work around the firewall’s
limitation of importing a self-signed certificate with matching fields. We will revisit this in detail later on.
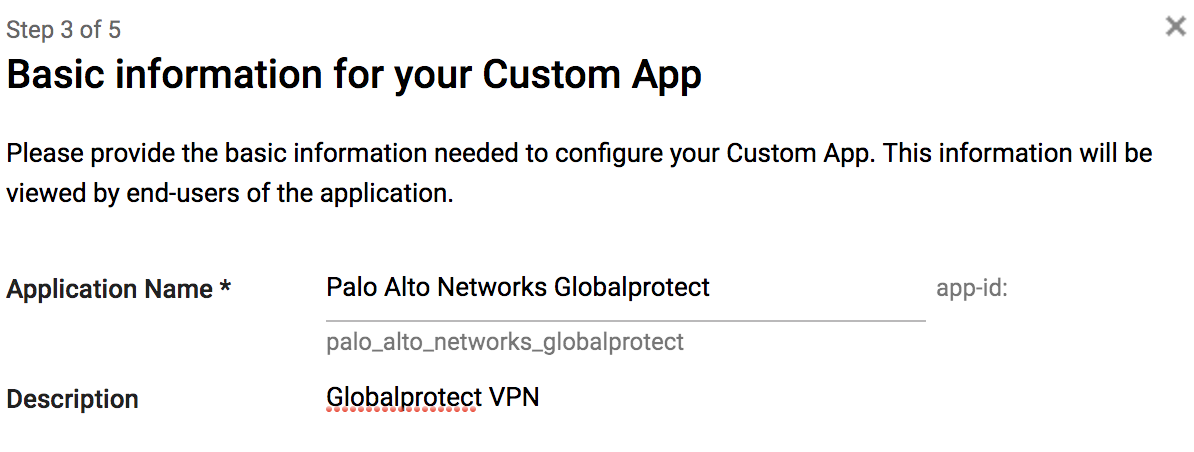
- Step 3 of 5: Enter a name and description for the application, and optionally upload a logo. All of these options
are only locally-significant, so whatever we set here will not affect the overall configuration.
- Step 4 of 5: Setup the Service Provider Information:
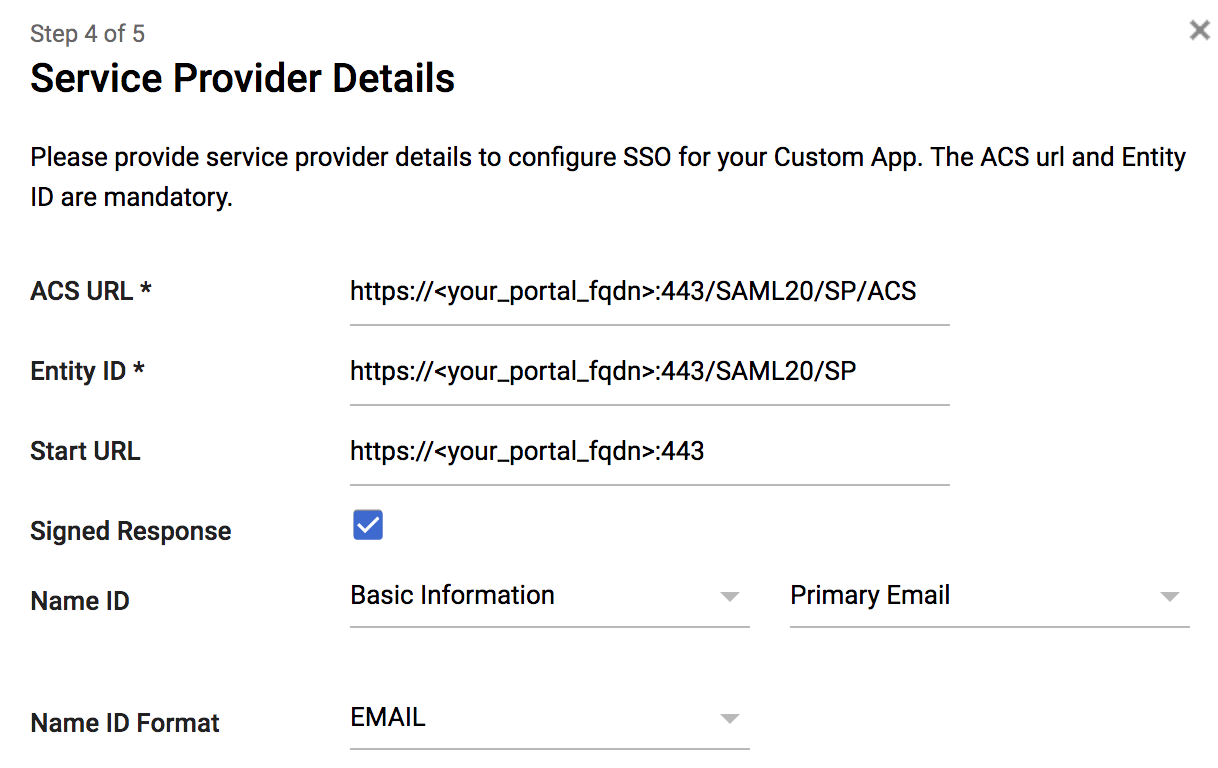
- ACS URL: https://<your_portal_fqdn>:443/SAML20/SP/ACS
- Entity ID: https://<your_portal_fqdn>:443/SAML20/SP
- Start URL: https://<your_portal_fqdn>:443
- Signed Response: YES
- Signed responses are a critical piece for authentication. The Palo Alto Networks Firewall expects signed responses, as a result, this option must be enabled for authentication to succeed.
- Name ID: Basic Information – Primary Email
- Name ID Format: Email
- In testing, this option also worked when set to “Unspecified”. For the purpose of normalizing user-ID information, “Email” was selected.
- Step 5 of 5: No additional attributes are necessary, but mapping additional attributes can enhance SAML data.
- Update: the Palo Alto Networks Firewall can now take advantage of additional options returned here (such as Group,
first and/or last name, user role). As a result, mapping additional Google Cloud Identity attributes allows you to
pass information from your Google domain back to the device. This can be useful for grabbing group information and/or
device admin privileges straight from user attributes stored in Google. We can map these attributes later on when we
create our authentication profile.
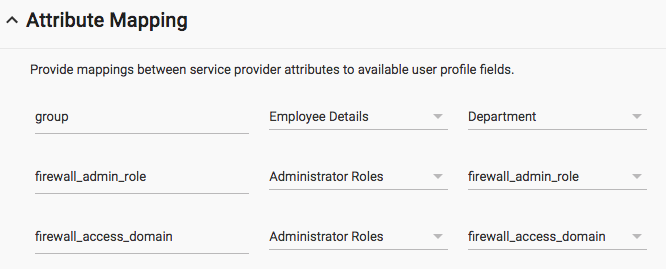
- Result of mapped attributes in authentication logs:
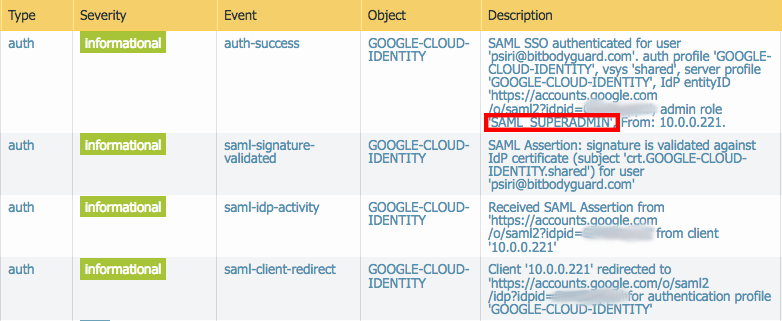
- Update: the Palo Alto Networks Firewall can now take advantage of additional options returned here (such as Group,
first and/or last name, user role). As a result, mapping additional Google Cloud Identity attributes allows you to
pass information from your Google domain back to the device. This can be useful for grabbing group information and/or
device admin privileges straight from user attributes stored in Google. We can map these attributes later on when we
create our authentication profile.
Step 2: Enable the SAML application
- In your Google Admin console, navigate to Apps >> SAML Apps
- On the far-right of your new application, click the three vertical dots and select either “ON for everyone” or “ON for some”. For the purposes for this integration, I have selected everyone to enable the application organization-wide.
- When prompted for confirmation, select “TURN ON FOR EVERYONE” to confirm
Optional: Configure Google to Provide SAML Authentication for Palo Alto Networks Captive Portal
If you would like to use Google to authenticate users via Captive Portal, perform the following steps:
Step 1: Create a new SAML application for Paltto Alto Networks Captive Portal
- Navigate to your firewall and gather your captive portal redirect host information in one of the following ways.
- Device >> User Identification >> Captive Portal Settings
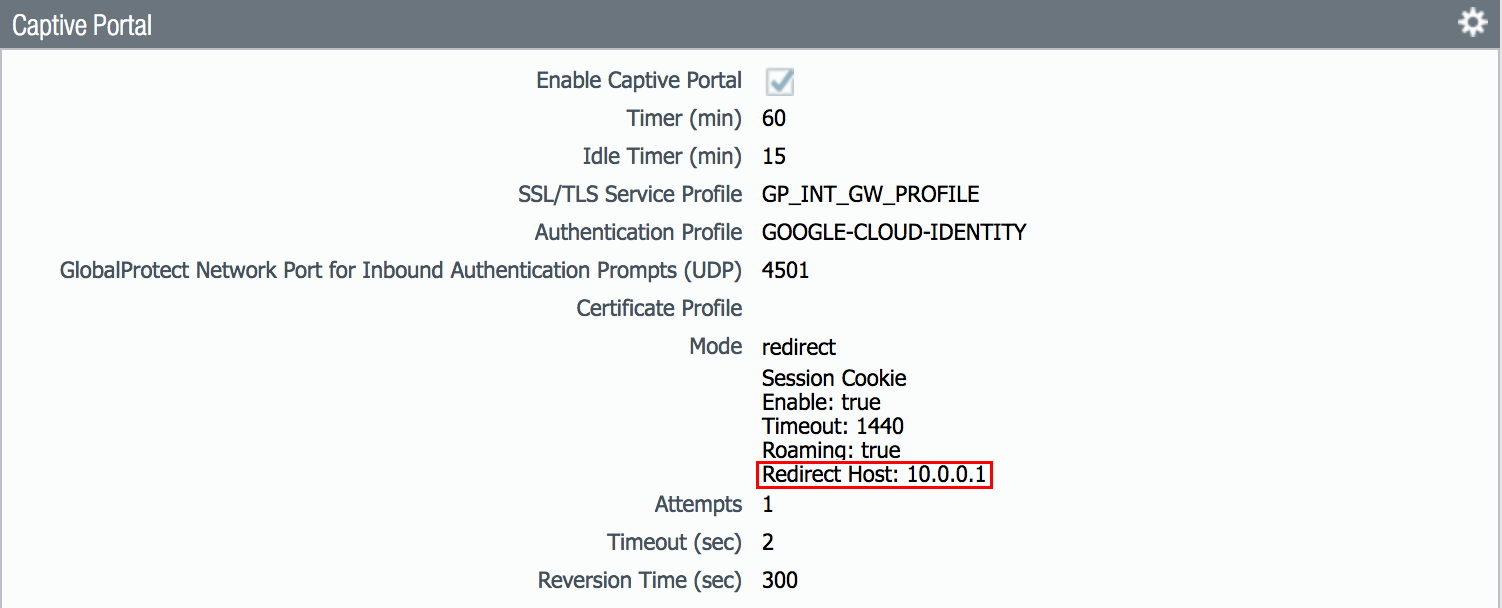
- If you have already created an Authentication Profile for Google Cloud Identity, navigate to Device >> Authentication Profiles. If not, we will get to this in a later step.
- Click “SAML Metadata” from within the “Authentication” column. A window will appear as
follows:

- In the dropdown, select “captive-portal”
- Click “OK” to export your SAML metadata
- Click “SAML Metadata” from within the “Authentication” column. A window will appear as
follows:
- In this case, we are using the IP of our firewall’s trust (inside) interface, 10.0.0.1.
- Device >> User Identification >> Captive Portal Settings
- Create a new SAML application for Captive Portal, following steps 1-3 of 5 above
- Step 4 of 5: Setup the Service Provider Information:
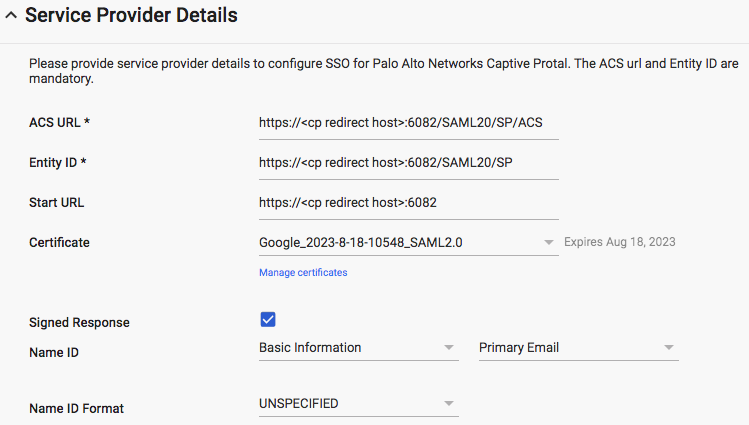
- ACS URL: https://<your captive portal redirect host>:6082/SAML20/SP/ACS
- Entity ID: https://<your captive portal redirect host>:6082/SAML20/SP
- Start URL: https://<your captive portal redirect host>:6082
- Signed Response: YES
- Signed responses are a critical piece for authentication. The Palo Alto Networks Firewall expects signed responses, as a result, this option must be enabled for authentication to succeed.
- Name ID: Basic Information – Primary Email
- Name ID Format: Email
- In testing, this option also worked when set to “Unspecified”. For the purpose of normalizing user-ID information, “Email” was selected.
- Step 5 of 5: No additional attributes are necessary, but mapping additional attributes can enhance SAML data.
- Update: the Palo Alto Networks Firewall can now take advantage of additional options returned here (such as Group,
first and/or last name, user role). As a result, mapping additional Google Cloud Identity attributes allows you to
pass information from your Google domain back to the device. This can be useful for grabbing group information and/or
device admin privileges straight from user attributes stored in Google. We can map these attributes later on when we
create our authentication profile.

- Result of mapped attributes in authentication logs:

- Update: the Palo Alto Networks Firewall can now take advantage of additional options returned here (such as Group,
first and/or last name, user role). As a result, mapping additional Google Cloud Identity attributes allows you to
pass information from your Google domain back to the device. This can be useful for grabbing group information and/or
device admin privileges straight from user attributes stored in Google. We can map these attributes later on when we
create our authentication profile.
Step 2: Enable the SAML application
- In your Google Admin console, navigate to Apps >> SAML Apps
- On the far-right of your new application, click the three vertical dots and select either “ON for everyone” or “ON for some”. For the purposes for this integration, I have selected everyone to enable the application organization-wide.
- When prompted for confirmation, select “TURN ON FOR EVERYONE” to confirm
Configure the Palo Alto Networks Firewall
Step 1: Setup the SAML Identity Provider Profile:
- In your firewall’s management GUI (or Panorama), navigate to Device >> Server Profiles >> SAML Identity Provider
- Import the SAML IDP metadata downloaded from your Google Admin Console
- Although you could manually enter many of the IDP metadata fields, there is currently a limitation around importing a cert with identical CN and issuer fields. We will address this shortly. Google is creating a self-signed CA for signing SAML requests, and the firewall will not import them. Long story short: You will not be able to manually import this certificate until this limitation is patched.
- Give your profile a descriptive name
- Do not select “Administrator use only” option unless you plan to use this profile ONLY for administrator authentication.
- Ensure “Validate Identity Provider Certificate” is enabled
- Click “OK” to save the SAML IDP profile
Step 2: Create a Workaround for Google’s CA Certificate:
- In your firewall’s management GUI (or Panorama), navigate to Device >> Certificate Management >> Certificates
- You will now notice that during the SAML IDP metadata import process, your Google IDP certificate has been imported. The problem here though is that the signing certificate should actually be a self-signed CA for signing SAML requests, but the firewall will not import any certificate with identical CN and issuer fields. We will need to manually change the certificate to a CA before we can proceed. The easiest way to accomplish this is with a quick XML edit.
- In your firewall’s management GUI (or Panorama), navigate to Device >> Setup >> Operations
- Save your progress so far. Select “Save named configuration snapshot” and choose a name.
- Export the saved config in XML. Select “Export named configuration snapshot”, choosing the saved snapshot just created.
- Open the XML configuration in any text editor. We are going to set the certificate’s CA flag, so that the certificate will properly become a CA upon import.
- Find the certificate within your firewall’s XML configuration. Generally certificates are near the top of the XML config, and should not take long to locate. The field we are concerned with specifically is “<ca>no</ca>”. Modify this line to “<ca>yes</ca>”
- Save the modified XML config.
<entry name=”crt.GOOGLE-CLOUD-IDENTITY.shared”>
<issuer>/O=Google Inc./L=Mountain View/CN=Google/OU=Google For Work/C=US/ST=California</issuer>
<common-name>Google_Cloud_ID</common-name>
<ca>yes</ca>
<subject>/O=Google Inc./L=Mountain View/CN=Google/OU=Google For Work/C=US/ST=California</subject>
<public-key>—–BEGIN CERTIFICATE—–
…<<<content omitted>>>
…
—–END CERTIFICATE—–
</public-key>
<algorithm>RSA</algorithm>
</entry>
Step 3: Import the modified configuration and create a certificate profile:
- In your firewall’s management GUI (or Panorama), navigate to Device >> Setup >> Operations
- Import your modified XML configuration. Select “Import named configuration snapshot” and choose the modified XML file.
- Load the imported config. Select “Load named configuration snapshot”, choosing the modified XML config uploaded in the previous step.
- Navigate to Device >> Certificate Management >> Certificates, and verify that your Google IDP certificate now has the “CA” flag set

- Navigate to Device >> Certificate Management >> Certificate Profile
- Create a new certificate profile for your Google Cloud Identity SAML IDP. The sole purpose of this profile will be
signing SAML requests.
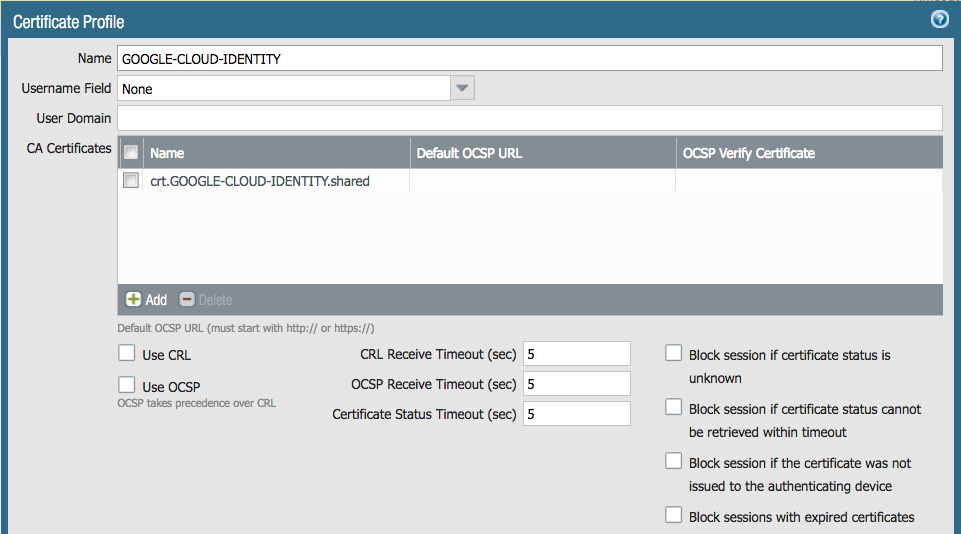
- Give the profile a descriptive name, such as “GOOGLE-CLOUD-IDENTITY”
- Leave all options at default
- Under “CA Certificates”, select the certificate we just made a CA
- Select “OK” to save the certificate profile
Step 4: Create an authentication profile for Google’s SAML IDP
- Navigate to Device >> Authentication Profile
- Select “Add” to create a new authentication profile
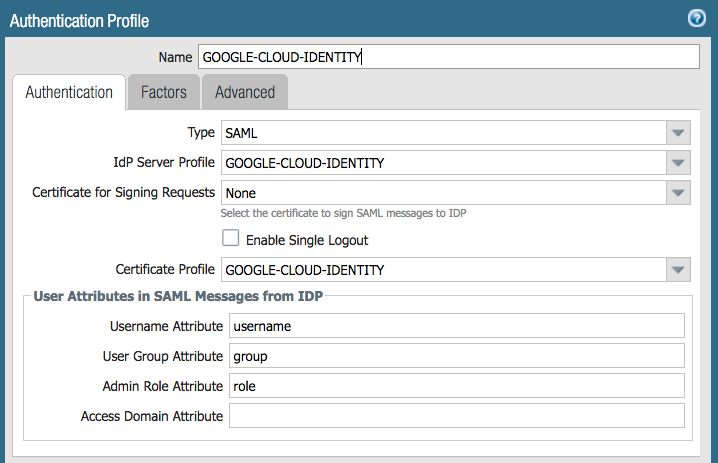
- Give your new authentication profile a descriptive name
- Under the “Type” field, select “SAML” from the dropdown menu
- Under the “IdP Server Profile” field, select the SAML identity provider profile created in step 1.
- Under the “Certificate for Signing Requests” field, select “None”
- Google does not require signed requests. Palo Alto does require signed responses.
- Under the “User Attributes in SAML Messages from IDP” section
- Leave the “Username Attribute” field as “username”
- No additional attributes are necessary, but mapping additional attributes can enhance SAML data.
- Update: the Palo Alto Networks Firewall can now take advantage of additional options returned here (such as Group, first and/or last name, user role). As a result, mapping additional Google Cloud Identity attributes allows you to pass information from your Google domain back to the device. This can be useful for grabbing group information and/or device admin privileges straight from user attributes stored in Google. We can map these attributes later on when we create our authentication profile.
- (Optional) map groups by entering “group” in the “User Group Attribute field”
- (Optional) map admin roles by entering “role” in the “Admin Role Attribute Field”

- Result of mapped attributes in authentication logs:

Step 5: Modify the Globalprotect Portal Configuration
- Navigate to Network >> Globalprotect >> Portals
- Select the portal and navigate to the “Authentication” tab

- Add the SAML authentication profile created in Step 1
- If necessary, reposition the authentication profile higher in the authentication order
- [OPTIONAL, Recommended] Enable MFA redirects for Google Cloud Identity
- Navigate to the “Agent” tab
- Under “Configs,” Select the agent configuration for which you would like to enable Google MFA (2FA) redirects.
- Navigate to the “App” tab
- Ensure the “Enable Inbound Authentication Prompts from MFA Gateways” is set to “Yes”
- Add your Google SAML IDP URL to the “Trusted MFA Gateways” section

- NOTE: If you are using certificate profiles are another means of authenticating users, ensure that one of the following is true, or authentication will fail:
- The “Username Field” option is set to “None”

- The “Username Field” option is set to “Subject”and the CN of each issued certificate matches the email address of your Google Cloud Identity’s users
- The “Username Field” option is set to “Subject Alt”, and “Email” is selected. Ensure that the email address of your issued certificates matches the email address of your Google Cloud Identity’s users
- The “Username Field” option is set to “None”
Step 6: Modify the Globalprotect Gateway Configuration
- Navigate to Network >> Globalprotect >> Gateways
- Select the target gateway and navigate to the “Authentication” tab

- Add the SAML authentication profile created in Step 1
- If necessary, reposition the authentication profile higher in the authentication order
- NOTE: If you are using certificate profiles are another means of authenticating users, ensure that one of the following is true, or authentication will fail:
- The “Username Field” option is set to “None”
- The “Username Field” option is set to “Subject”and the CN of each issued certificate matches the email address of your Google Cloud Identity’s users
- The “Username Field” option is set to “Subject Alt”, and “Email” is selected. Ensure that the email address of your issued certificates matches the email address of your Google Cloud Identity’s users
Step 7: Commit the configuration
Workflow and User Experience
To explore the different workflows the user will experience, please refer to the following pages: